|
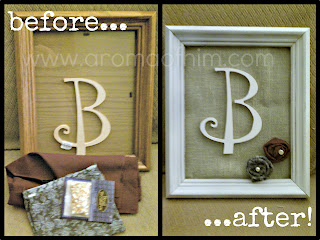
I started by removing the back of the frame, along with the glass. I took the frame outside and spray painted it white. I didn't worry about getting it perfect because the wood showing through added a nice effect. While I was outside, I also spray painted the "B".
While those were drying, I took the backing of the frame and wrapped it in burlap. I then realized that wrapping it added too much thickness to the edges, which meant I couldn't put it back together with the frame. So, I cut the burlap and hot glued it to the backing of the frame so that it only covered the edges.
The roses were a little bit tricky and it's kind of hard to explain the process. I got the idea from Pinterest. When I clicked to find the instructions, I was led to this site. As you can tell, it's not in English. So, I did my best by simply using the pictures (or you can use Google translate). I didn't take pictures of my own because I was too focused on trying to accomplish the task of making the roses. I think there's a step for sewing the edge, but I didn't even do that and it turned out fine.
Once the roses were complete, I hot glued a bead onto each of them. Then, I retrieved my spray painted frame and pieced it all back together.
I glued the "B" onto the burlap and then I positioned my roses. Once I decided on a good spot for them, I hot glued them down as well!
I thought about making a burlap rose as well but I was running out of time. I actually made this gift right before we went out to dinner with the friends that I gave this gift to. So, that just goes to show you, this is a very simple, handmade, personalized gift and it looks like you spent hours piecing it all together. There's no harm in letting the receiver of this fine gift continue to think that ;-)


No comments:
Post a Comment
I love hearing from readers so don't hesitate to leave a comment! I always try to reply back in a timely manner. If you'd like to be notified when I reply to your comment, be sure to check the "notify me" box. Thanks!